A moisture management plan for CLT construction: what to control from delivery to handover
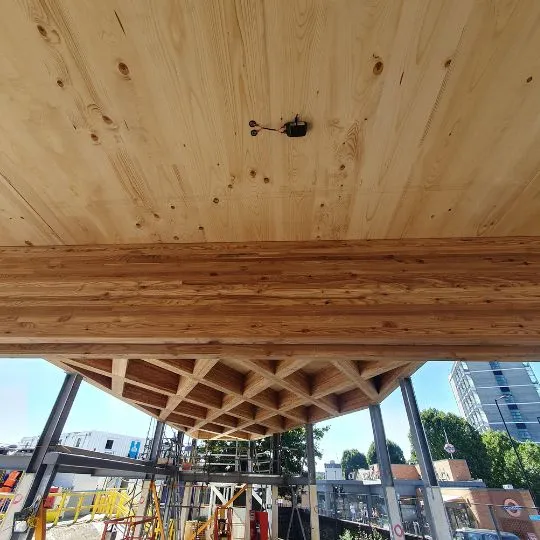
This is a plan for the people who run a CLT or mass-timber site: the main contractor’s project and site managers, the timber contractor, the structural or building-physics consultant asked to write the moisture plan, and the developer who should be asking for one. It follows the construction sequence from delivery to handover and says, for each stage, what to control, where continuous monitoring earns its place, and what gets documented. It describes typical practice on Tector projects; the contract decides the final allocation on yours.
The plan is worth having before the first element arrives, because it is where three things live that otherwise live nowhere: who owns moisture on the site, what “dry enough” means at each stage, and the record. In BUILD’s review of twenty Danish timber buildings, two projects were reported to have required remediation for built-in moisture; neither had a written moisture plan. That is an observation, not a guarantee the other way round: RISE’s study of CLT erected without weather protection found growth on projects that had planned for moisture too. The document matters; how it is implemented, protected and responded to matters as much.
Before the elements arrive
Assign an owner and the acceptance criteria. The first line of any moisture plan is a name. Someone owns moisture on the site through every stage, and that person has written criteria for what “dry enough” means at delivery, before enclosure and at handover. The criteria come from the contract and the project moisture plan, informed by the CLT manufacturer’s own instructions and the consultant; they are project-specific and confirmed for the assembly, not copied from a generic figure.
Record delivery condition. CLT and glulam elements typically leave the factory in a controlled, factory-dry condition and should arrive visibly dry and protected. Good practice is to record the condition on arrival - photographs and spot moisture checks at faces, edges, end grain and any damaged wrapping - usually by the main or timber contractor, against the supplier’s delivery criteria. A delivery record is the baseline every later reading is compared with, and the document that settles whether a wet element arrived wet.
Sensors can be installed at the factory or in the storage yard when the project wants a baseline through transport, or wants to monitor points that will be concealed and inaccessible after erection. On many projects, installing at or immediately after erection is more practical: it reduces handling damage and makes the final positions easier to document.
Storage and handling on site
Keep elements off the ground on level dunnage, shed water off horizontal faces, protect end grain and joints, and keep ventilation under any wrap. The failures are as predictable as the rules: torn or loose wrapping, water entering from below, water pooling on horizontal faces, and sheets that look protective but trap water against the timber for weeks.
Storage is monitored less often than the erected structure, and on a short, well-run programme that is reasonable. It is justified where storage is long, the yard is exposed or the elements are high-value. The monitoring points, whether sensors or repeated checks, are the bottom of stacks, exposed end grain, any damaged wrapping and the elements closest to the ground.
Erection and the exposure period
Between the first panel going up and the building being closed, the structure is a timber building without a roof. This is the stage the plan exists for, and the stage where the sensors go in.
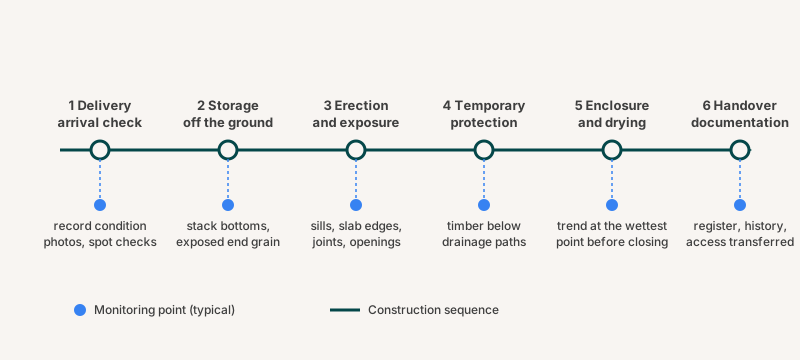
Six stages, one monitoring point per stage. The plan follows the sequence; the sensors follow the water. Schematic.
Where the sensors go. Prioritise the locations where water collects, penetrates or will later be concealed: wall sills and base rails, slab edges and panel joints, exposed end grain, roof panels and parapets, window and door openings, shafts and cores, penetrations, connections and any timber sitting below a temporary drainage path. The locations that are commonly missed are the underside interfaces, the bottoms of stacks, column bases, membrane laps and the details that get closed quickly.
How many. A CLT project’s sensor count follows a risk-based plan, not an area ratio. The count should reflect the distinct construction types on the project, the exposure zones, the water paths, the end-grain interfaces, the concealed details, the drying conditions and the consequence of failure at each point, with enough reference points to tell a local event from a general trend. Budget adjusts the coverage transparently; it should not determine it silently.
When and by whom. Install as soon as the relevant element is stable and accessible, and before finishes or protection hide the point. The timber or main contractor can normally install the hardware from Tector’s placement plan and instructions, with Tector or the consultant checking the first installations and the final mapping. Every sensor is registered against its position so an alert can be located without a search. The sensors are wireless and report continuously to the project’s dashboard through a gateway on site; how the system works covers the mechanics.
What the data shows after rain. Surface and deeper points may respond differently depending on the wetting path: water reaches depth quickly through end grain, joints and interfaces, and moisture at depth or in a concealed interface often dries more slowly than an open face. That is what makes the deeper, insulated-pin readings the honest measure of a wetting: a surface that looks dry a day later is not evidence that the joint behind it is. The response is the same every time: inspect the exact location, stop the water source, remove standing water, improve the drainage or protection, start controlled drying if required, document the action, and keep watching the trend before closing the assembly.
Temporary protection
The strongest controls are a temporary roof or full site cover, robust membranes with sealed joints and deliberate drainage, just-in-time delivery, immediate protection of end grain and interfaces, and active water removal. RISE’s field study of four seven-storey CLT buildings erected without weather protection in Sweden found microbiological growth - detected by sampling, not visible mould - in all four buildings and on almost all examined floors: of 200 analysed points, half had sparse growth and about a third moderate-to-rich growth. Protection is the control; monitoring is the verification that it worked.
False security comes from loose tarpaulins or factory wrap used as long-term protection, membranes without sealed edges or drainage, and protection installed only after the wetting has happened.
Monitoring changes the detail sometimes, not just the record. On the Faroe Islands’ first CLT building, the data showed that the original baseboard detail was not drying adequately, and the team changed to steel brackets that improved the airflow beneath the CLT elements. That is a plan working: a reading, a decision, a detail changed before it was closed in.
Enclosure and drying
Do not conceal timber until the agreed criterion has been met at the wettest concealed location. The criterion should come from the contract and the project moisture plan, confirmed for the assembly with the CLT manufacturer and the consultant. Industry benchmarks exist for when low-permeance layers and toppings may go on; none of them is a universal acceptance limit, and the plan should name the one it uses and where it comes from.
Significant or deep wetting can take weeks or months to dry, not days. External walls, roof panels, end grain, joints and areas behind membranes or toppings dry more slowly than open internal faces. Cool, humid weather, deep wetting, thick elements, poor airflow and early encapsulation all slow the process. A closing decision made on the programme date, or on a few surface checks, is the decision the plan is there to stop; the trend at the wettest point is the evidence that replaces it.
Documentation and handover
A contractor’s QA system wants a record it can file. A practical one combines baseline readings, routine dashboard review, threshold confirmation before enclosure, an alert and action log, installation photographs and milestone or final reports. On the Faroe Islands project the daily updates were integrated into the contractor’s Dalux system and detailed reports went to project management; the format is the contractor’s, the content is the plan’s.
At handover the owner or facility-management team should receive the sensor and gateway register, the marked-up locations, the tags and thresholds, the complete trend history, the alerts and corrective actions, the status at closure, any unresolved risks, the final report, and the access and billing details. The consultant or contractor keeps access only where their post-completion role requires it. What the record should contain, item by item, is the subject of its own guide; who owns each stage is covered in who owns moisture monitoring.
The plan in ten lines
- Assign an owner and the acceptance criteria.
- Record delivery condition.
- Minimise storage and keep timber off the ground.
- Protect faces, end grain, joints and penetrations.
- Provide drainage and rapid water removal.
- Place sensors at representative high-risk points.
- Map and verify every installation.
- Review alerts and drying trends routinely.
- Do not conceal timber until the agreed criteria are met.
- Hand over the full record, the access and the response responsibility.
What a plan cannot replace
A plan and a monitoring system cannot replace weather protection, drainage, good detailing, disciplined sequencing, inspections or a competent timber contractor. Sensors observe selected points and support decisions; they do not make an unprotected site, a poor detail or an unmanaged alert safe. A plan that says otherwise is not a plan.
The three most common mistakes on CLT projects with moisture problems are treating the transport wrap as long-term site weather protection, failing to protect or drain end grain and horizontal interfaces, and closing assemblies on the schedule or on a few surface checks rather than on evidence from the wettest concealed locations.
The objections a plan meets are also predictable: cost, installation effort, fear of false alarms and the belief that normal inspections are sufficient. The answers are in the plan itself - targeted, risk-based coverage rather than blanket sensors; installation by the site team from a placement plan; agreed ownership of alerts before monitoring starts; and monitoring framed as continuous evidence that reduces rework, delay and handover disputes, not as a substitute for site management.
Sources practitioners use
Start with the CLT manufacturer’s own storage and installation instructions, then project-specific mass-timber moisture guidance. For local practice, check the current TRÆ and SBi guidance in Denmark, Swedish Wood in Sweden and Timber Development UK in the UK, verifying edition, climate and assembly applicability before adopting a figure. The plan names the guidance it follows; it does not reproduce it.
Two projects where the plan was the difference
On a school project in Norway, Kruse Smith placed sensors at the roof edges, under windows and across the facades and let real-time data replace spot checks; a roof section left incompletely sealed was picked up immediately, before it became a remediation conversation. At Northgate House in Oxford, sensors on every floor at the likeliest ingress points caught a leak that might otherwise have gone unnoticed and supervised the drying of a CLT flat roof. Both are the plan’s sixth and eighth lines in use. For a residential CLT build with its plan in place from the start, see Ripple Residence.
Writing it for your project
The stages are the same on every CLT project. The owner, the criteria, the sensor positions and the handover set are not. That is what the project assessment settles: tell us about the structure, the programme and the exposure, and you receive a recommended monitoring approach, the placement principles for the site and a suggested next step matched to your stage.
Request a project assessment. For the system itself, see wireless moisture sensors for timber structures; for why moisture matters in CLT in the first place, start with smarter CLT construction starts with better moisture insight.